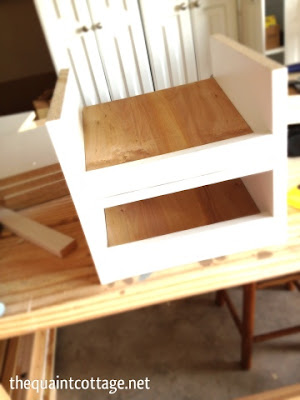
As I posted on facebook yesterday, I built these super easy and super affordable can good holders for my new pantry shelves I just installed in the laundry room (which serves double duty as the pantry).
Here are the eight new basic stock cabinets from Lowe's I just added to the wall of the laundry room to make use of the space of the wall (9' high ceilings). I'm loving not having the doors on the fronts so we can "shop" for what we need by just walking in the room. I'm still in the whole "styling" and organizing stage of the shelves, so don't roll your eyes too much at the incomplete look. Pretty please?
Here is the view from the window wall. If you look at the bottom of the picture, you can see the installed can good organizers. I chose to use the same white melamine shelving as what is used on the cabinets to make it blend into the inside of the cabinet. PLUS, I didn't have to paint it! Score one for Karen :)
The can good organizers I found on line were metal and didn't fit the exact opening I needed. I built my own for much less than the metal ones (which were $36 each!). With this plan, you can build up to four of the size I made for under $36.
See how they just blend into the cabinet and look like they are built in it?
Here is the process.
Step one: Cut the sides and the ledges.
Step two: Attach pieces to the walls of the unit.
Step three: Set the lauan onto the ledgers.
See? I told you it was easy! Below I drew up a sketch of the size I used for my 12" opening with a cabinet depth of 11.5" (if you have doors, it will be a depth of 10.5-10.75"). The height of my can good holders are 11". Again, the plan can be adjusted to any size space, but I think if you go past three cans wide, you may want to use something more sturdy than the lauan. Additionally, if you make the unit taller and add shelves, make certain the cans will fit thru the opening, don't just measure with the can in place on the shelf.
Cut list for 1 can good holder:
2 - 11"tall x 11.5"deep walls
(the melamine is 11.75" deep, I had to trim mine down) If your doors are on your cabinets, your cuts will probably be between 10.5" and 10.75"
6 - 1x2" 10.5" strips
2 - 10.5x10.75" lauan cut for the shelf
If your doors are on your cabinets, your cuts will probably by between 9.75" and 10"
I used 1.25" finish nails, but you can use screws if you prefer.
Wood glue, wood filler, etc.
 |
| Flip the ledge over and attach the ledge to the front (finished) edge of the melamine. Make sure the bottom ledge is flush with the front and the bottom of the wall. |
 |
| Measure down 5.5" (halfway point) from the top and mark the edge of the wall. Attach the top ledge to the wall keeping the front of the ledge flush with the side wall front edge. |
 |
| Attach the back supports at the marks you made in the last step. |
I hope this gave you a helpful way to store your can goods.
Let me know if you have any questions.
Happy building!
Karen :)
Linked to:


It just looks better and better!
ReplyDelete@Susan Thanks for your positive comments.
ReplyDeletei need at least one of these at the bottom of my pantry! thanks for sharing :) {found your post through show me what ya got}
ReplyDeleteDo these help you rotate your new cans with old? I am not sure I can tell from your photos
ReplyDeleteThese do not have an opening to put the new cans in, but it would be easy to add, you would either need to double the height or remove the second tier of can goods and build a shelf slanted toward the back of the lower shelf. My needs didn't require that since I usually only have about four cans on one type at a time.
ReplyDeleteYEAH! I found you! from your post on Real Simple. I love this idea. Great job.
ReplyDelete@Tracy Thanks Tracy! So glad you found it.
ReplyDeleteThat's Brilliant I'm glad I found this I was struggling to keep my pantry orderly this is going to help quite a bit thanks.
ReplyDelete@RedmanVan Thanks for checking it out. I hope it gave you inspiration for your project.
ReplyDeleteWhat are the cabinets called you got at Lowes? Are they from Closetmaid?
ReplyDeleteI made a variation of these. I made mine with a bottom and top shelf for one canned good. I made the top shelf back ledge just a little lower than the front and left space at back of top shelf for a can to roll and be on top of back can on bottom. Load from front on top and as used from the bottom, the cans roll to keep it filled.
ReplyDelete