Showing posts with label Paint. Show all posts

Upstairs Hallway - Work in Progress

Pin It
Over the Thanksgiving break, I started on the upstairs hallway before I begin work on the second phase of the kiddos bedrooms.  I know, waaaay behind on my schedule. 

Yes, I loathe popcorn texture.  You probably already knew that if you have read the blog at any point in the last month.  Now there are only two rooms left upstairs (both bathrooms) left to do.  Don't worry, I'm not going to skip around and start on those right now.  I'm saving the bathrooms until next year.  I think.  hahaha

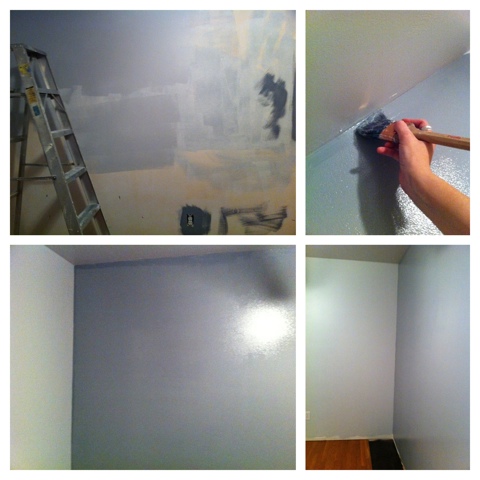
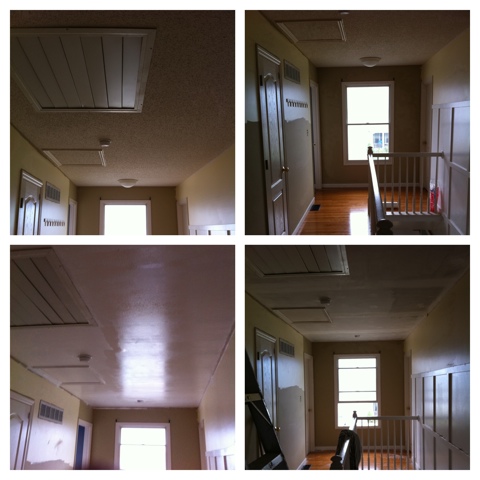
The top two pictures are of the ceiling before I scraped.  The bottom right is after and the bottom left is with a wet coat of primer.

Then, I installed these lights that match the energy saving ones I installed in the downstairs hallway in the spring.  The light is a bit brighter than normal fixtures because of the bulbs, but it is a hallway.  I don't need mood lighting in my hallway.  Do I?


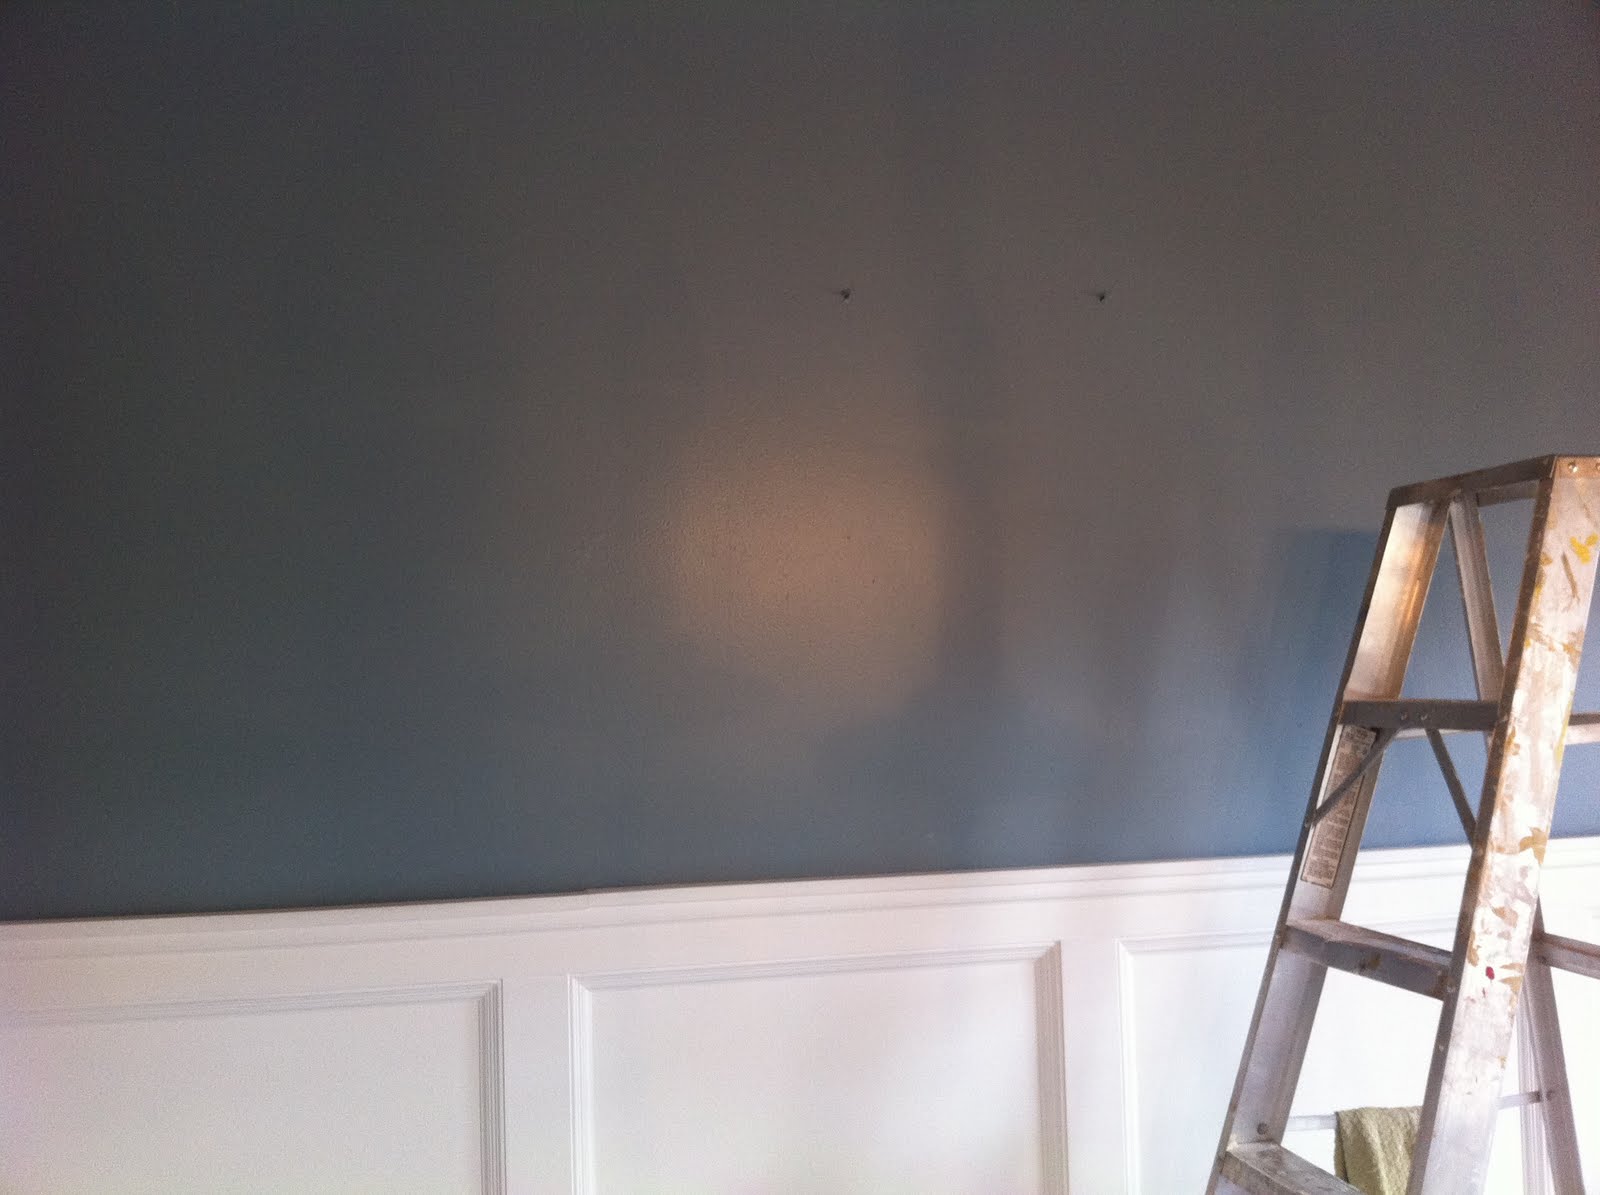
I started to paint the walls yellow, but soon decided I didn't like it.  I usually LOVE yellow when I see it in anyone else's home, but when I try it I always end up hating it.  PS The khaki color was the starting point but it needed an update.


So, I started to repaint the walls white just like the square molding wall on the stairs.


I think this is the first time I have ever painted a wall white.  And not just any fancy color, oh no!  This is Bright White (semi-gloss).  I've been using it on all the trim and for some reason thought - Why Not?  These walls are hard to keep clean with the little guys handprints, scuff marks and bumps.  I figured I'd always have this bright white on hand to touch up if I couldn't wash the dirt from the semi-gloss paint.


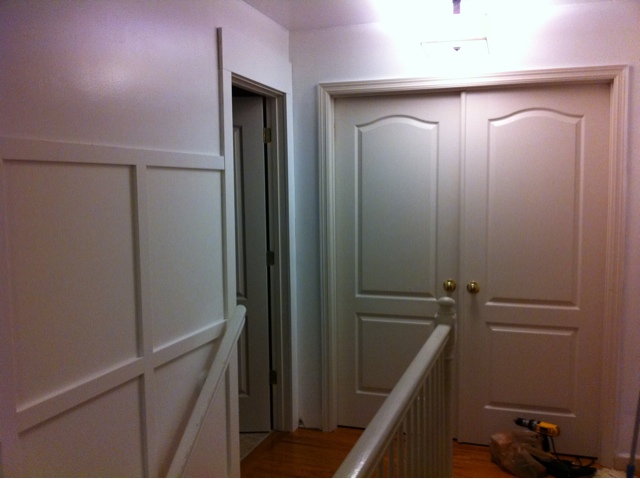
As you can see, I started to replace the trim around the doors to a thicker, plain board with a large board overtop (see the left door next to the double doors).  I did this on all the doors on the first floor and liked the way it looked.  I still need to add the 1x2 top plate, but I'll do that next week when I change out the rest of the trim on the bedrooms and the closet and the window. 

But, I need your feedback.  I've always been a fan of white trim, white doors and white handrails, but now I think I want to change it. 
Reason #1 - Since I have to repaint the doors to update them from the off-white builder whiter anyway, I am thinking I may change them.
Reason #2 - A dark color handrail and door will help mask any dirt, scuffs, etc. (notice a trend)
Reason #3 - I think the dark contrast with the white would look dramatic, but in a classic way.

I thought of maybe doing an espresso handrail (maybe spindles) with matching painted doors.  Of course, I'll change out the brass fixtures to either a brushed silver or a bronze.


What do you think?  Keep it white or try espresso?  Have you painted your doors/handrails a different color than standard white or stain?  I'd love to hear your thoughts and any blog links with before and after pictures if you have seen any.

Here are a couple of pictures I found on Pinterest.  I do apologize I can't give photo credit.  I couldn't find the original source for the pictures.

Photo via Pinterest - Source not found yet

Photo via Pinterest - Source not found yet
Thanks for stopping by my friends,
Karen

Prep Work for Fun Wall Accent

Pin It Tonight (while the last box of wood floor acclimates to the house) I prepped a fun accent wall in my son's room. I was going to paint stripes or circles, but I wanted to try something a bit different.


Do you like the before picture?  Obviously it takes many tries to find the right color.
 While looking in the Restoration Hardware children catalog last week for new bedding, I found this cool drop cloth accent wall piece. I thought it would look amazing in my son's room. However, we have to think and rethink everything we do in his room due to his autism. If we hang something like this on his wall, chances are very likely he will have it ripped off in less than an hour. He has a funny little habit of collecting all the pillows, blankets and sometimes curtains from around our house.

Restoration Hardware Photo


Instead, I am going to design a wall accent like this with paint I already have on hand. Since it will be attached to the wall, he can't remove it.

Tonight (even though it is pitch black outside at dinnertime) I was able to drag myself from the warm couch and painted a square on the wall with the left over paint from the other boy room I just finished.

Tomorrow night I'll draw out the pattern and paint the first color. I have almost every color of the rainbow of paints, so the hardest part will be picking which colors to use.  Hmmmm, now that I'm looking at the inspiration photo...maybe I should have used the beige colors. 

Thoughts? Have you painted a fun accent wall? 

Master Bedroom - Mini Make Over

Pin It
It all started with the need for lighting...


Isn't that how all projects get started?  I just need new lights for my bedroom...  Have you ever read the book "If you give a pig a pancake"?  Yep, this is so that book.

Do you have that one room in your house where you have no idea on how you want it to look?  For me it is the master bedroom.  The room where I have no vision, no inspiration and no money to spend.  But, the room where I spend much of my time.

WARNING:  The photo you are about to see will shock you.  (And embarrass me)

I'm sharing this photo for two reasons - 1)  It can only get better from this starting point.  2)  As much as I like to think this room is my special place to retreat from the world, that little stuffed animal on the chair and the blanket on the floor proves children have been playing in here.  According to the messy blanket on the bed, jumping could have been involved.

This room needs to change.
List of things that needed to be changed/added:
- Lighting.  My lighting for the bedroom was seriously lacking.  I love to read in bed at night, but the only lighting we had (left) was my small lamp on my end table.  It is not adequate for some reason.  The lamp on my hubby's nightstand broke.  We have four kids and this is not a new thing to happen in our house.  :)
- End tables.  The end tables we have were purchased several years back at Crate and Barrel.  They were cute, but designed very poorly.  The cam system that held the panels together always came apart.  So then anytime I would go to adjust the position of the table...it fell apart.
- Must have seating or a low bench at the end of the bed.  Not really for seating, but for the little dog to make his way up onto the bed.  If he doesn't have access, I don't get sleep. 
- Laptop table.  I know it sounds weird, but I have never met a laptop that I can place on my lap.  They overheat when the fan is blocked with your leg or a couch or bedspread under them.  I don't ask for much, but I want to be able to write or surf the web from my bed when I have free time.
- New comforter and shams.
- Make a pillow sham for a large body pillow as the bed center piece.
- Possibly a rug at the end of the bed to add a cozy look to the room.  I had already installed hardwood flooring in the room a few years ago, but I love having area rugs on top of the hardwood.

Then I stumbled upon a blog called House of Turquoise.  I fell in love with this bedroom instantly.  It has a similar layout to my bedroom and it has a classic look that I love.  However, the furniture is all white and mine is dark.  :(

See the photos below.


Same vaulted ceiling with ceiling fan, door on the side wall (mine is a closet), bay window, wood floors... and this one had a footstool at the end of the bed.  I could totally see my room being just like this - in my head.  I'm pretty sure my hubby won't mind if I paint the walls (again).  I just don't see him letting me paint the new furniture from the espresso color to white.  I could make a white slipcover to pull over the dark "leather" headboard and footboard....what do I do?  I can just imagine how utterly cheerful and crisp my room can be like this beautiful picture.

As of today, one end table is finished & painted.  I decided to make mine a bit different from hubbys side.  On mine I will create a mini-bookcase to house some books and the laptop.  Boards and paint were finished on the lower half of the wall.  Lighting finished. 

Here is where the room is today...


It is slow progress....but it is progress.  Right?  Hopefully, next weekend the other end table will be finished.

Chemistry 101

Pin It Remember back in science class when you had to rust a nail with vinegar?  Well, what do you get when you rust steel wool pads with vinegar?

Rustic Wood Stain - of course.

I poured a container full of vinegar (quart) & put a few course-grade 3 steel wool pads.  The "stain" gets darker the longer you allow the rust particles to sit in the vinegar.  24-48 hours would be a lighter stain. 

For my mixture, I let it go few extra days.  You can stop the process by straining (with a coffee filter) the small metal particles.  However, you will want to use a drop cloth or newspaper under your project.  This is basically rust and it will stain your concrete in the garage.

I wanted a rustic, weathered look for these little storage crates.  At this stage, they look too new.


Below, the one on the left is one I just brushed with the liquid.  The one on the right was the one I did about five minutes earlier.


Here is the beginning raw wood color.

Here are the four crates at four different shades just after I finished the final one.


Final rustic color, still needs to dry and add a layer of poly.


This process could come in handy creating one of those old looking benches for the front porch (when you don't have old reclaimed wood sitting around).

Link parties -
Todays Creative Blog

Tip Junkie handmade projects


UndertheTableandDreaming

Aged Finish - Narrow DIY End Table

Pin It This weekend, I made this little table to fit at the end of my couch.  In case you missed it, you can find the link here!

Did you see the final photo of the $400 Pottery Barn tables?  Well, I loved the aged finish and loved the yellow.  However, when I sat in my room I realized the yellow wouldn't work for my color scheme of beiges and browns.

Here is what I came up with:

Slow Progress with the Dining Room

Pin It

The color change was supposed to be more gray than it turned out.  Even the color said it was Shale "Gray".  However, once I painted the walls, it looked more blue than gray.

Starting point of the dining room.  I had installed a more layered looking crown molding in the kitchen, so I ripped out the crown molding to redo the look. 


Soaked the popcorn ceilings with water and scraped and scraped and inhaled ceiling debris as I removed it.  Such a messy and gross process, but I found after the hard work and a gallon of primer and eggshell paint on the ceiling it looked amazing.  The nine foot ceilings truly looked taller.  The popcorn ceilings and flat paint really lower the height of the room.

Did I mention it was a messy job?

But, after a couple of hours (and a nice arm workout - bonus!)...  Popcorn be gone!!!


I get distracted so easily.  I took a break before priming the ceiling to stain the old wall mirror.

 Here is the painted wall.

Freshened up the white with Behr's Ultra White.

I'll finish the crown molding and add photos of the "finished" room.  But, really?  Is a room ever FINISHED?  Not in my house.

New light fixture I found on Amazon.com:

New chairs from Target (and my daughter's messy art project)


Thanks for stopping by and checking out this post.

Karen