
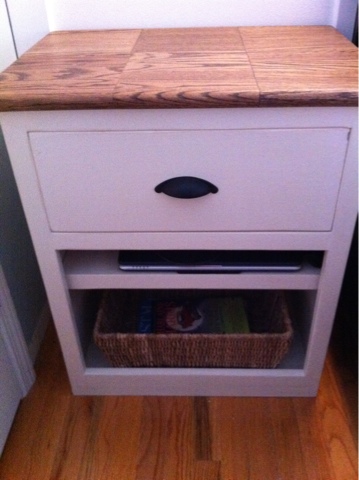
Here is my version of a couple of different nightstands I saw for sale on the internet from high priced stores. I needed a home for my laptop, books (that usually just piled on the edge of my old nightstand) and a drawer for the little things that just kind of clutter up a table.
Originally, I designed the sketch up plans with doors over the bottom opening. But once I had it together I changed my mind. I also changed the middle shelf to one that just sits on clets. I did add a large piece of plywood at the top to stablize the structure since it no longer had the middle support. If I have time, I'll redesign the original plan so it can be done either way.
I used some of my left over stair tread ends for the table top, screwed together.

Filled the seams with wood filler.

Sanded extra smooth.

Stained with Special Walnut color.

Cut list for the plan below:
2 - 27 1/4" x 16" birch paint grade plywood for the walls (I had the store cut an 8x4 sheet into 3 equal 8'x16" pieces to make other projects and make it easier to transport)
2 - 24" x 16" birch paint grade plywood for the bottom and the middle shelves
2 - 24" 1"x2" for the top bracing pieces
1 - 25 1/2" 1"x2" base board piece
2 - 25 3/4" 1"x2" wall edge framing
2 - 22 1/2" 1"x2" Front edge framing
2 - 27 1/2" 1"x10" (or you can add reclaimed wood or make your own top)
2 - 21 1/2" 1" x 6" (front and back of drawer)
2 - 14" 1"x6" (sides of drawer)
1 - 22 1/2" 1"x8" (drawer face)
25 1/2" x 27 1/4" backing (optional - I left mine off to be able to run my laptop cord, etc.)
4 - 12 3/16" 1"x2" Door sides
4 - 11 5/16" 1"x2" Door tops and bottoms
Optional - Attach the door frames to beadboard cut to fit frame or add plexiglass to the back of the frame or a chicken wire mesh or fabric
2 - 16" 1"x8" - Secure to the walls to bring them out to secure to the drawer glides
4 - Flush piano hinges for these light frames to make them as flush inside the opening as possible
2 - knobs for doors
1 - Drawer handle
2 - 12" drawer sliders
Finish Nails, screws, wood glue, sand paper, paint, stain, saw, safety equipment

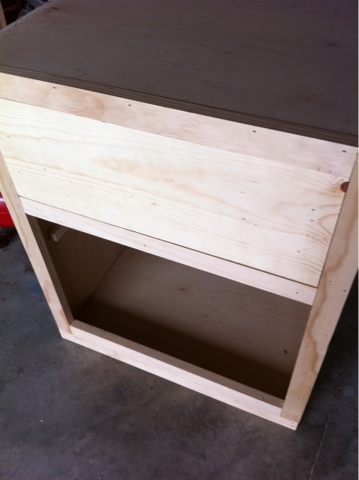
Construct the frame by nailing or screwing the walls to the shelves. Keep the bottom shelf up 1.5" from the bottom and the middle 11.5" from the bottom. Secure the top 1"x2" bracing pieces.


Add the base board piece to the unit

Add the two front edge framing pieces

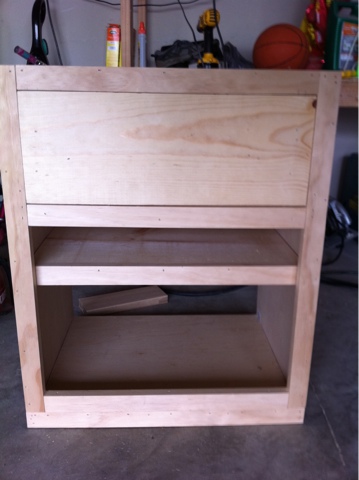
Add the top edge piece

Add the backing

Add the front edging and construct the doors. Attach with the hinges.

Add the top.

Construct and add the drawer.
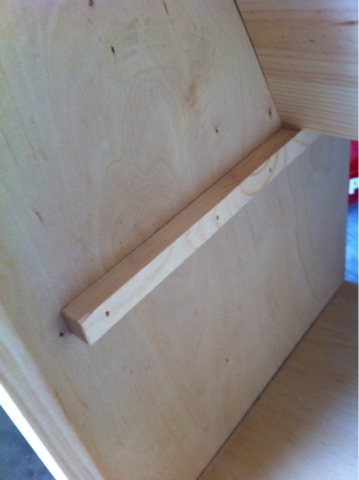
When I added the middle shelf to the top of mine, I added these clets for a removable shelf incase I wanted to add a larger basket down the road.


Linking up with:
The Gunny Sack
My Uncommon Slice of Suburbia
Home Stories A to Z
Tip Junkie
Not Just a Housewife
Gingersnap Crafts
Thirty Sixth Avenue
The Shabby Creek Cottage
House of Hepworths
Southern Lovely
Miss Mustard Seed
Perfectly Imperfect
Tatertots and Jello
Thrifty Decor Chick
This is gorgeous..
ReplyDeleteYou have done a lovely job making it and sharing with us on how to do it.. :)
Thank you Kay. Hopefully, I can remember to take some photos with my real camera.
ReplyDeleteIncredible! I commend you because all those numbers and measurements would have bugged me out:) They look awesome and I so wish I had the nerve to make me some.
ReplyDeleteHi Latoya. There are some great starter projects to help you build up your nerve to furniture projects. Check out a wonderful website www.ana-white.com There are so many easy plans you may like to try.
ReplyDeleteLooks so great! Love chalk paint!
ReplyDeleteI think I love it now too. I was back and forth on the first project, because of the price. But now, I understand how much easier it makes a project! Thanks :)
ReplyDeleteAmazing! How cool is it that you created this yourself?! Super impressive AND it turned out really great! I would love for you to share this @ Show & Share--
ReplyDeletehttp://southernlovely.blogspot.com/2011/09/show-share-6.html
Thanks Lindsay. I posted. What a great link party :)
ReplyDeleteWOW! I've never attempted anything like this...great job! Thanks for this sharing this at last Monday's "What In The Gunny Sack?" link party!
ReplyDeleteThank you Tonia.
ReplyDeleteAwesome job!!
ReplyDeleteThanks for linking up to Show & Share!!
One must act in painting as in life, directly.Sculpture is the best comment that a painter can make on painting.
ReplyDeleteLiquid painting plants
I just made two of these and they're awesome! I would love to hear your tips for using Sketch-up to model furniture.
ReplyDeleteMy first-ever furniture project! Pics are here: http://bit.ly/HUk803
Great directions, thank you!
@awgh Awww man, the link isn't available so I can see the pics. Maybe you can post the link on facebook?
ReplyDeleteI read a great tutorial over at Ana-white.com to learn to use Sketch-up.
@Karen @ The Quaint Cottage
ReplyDeleteI'm going through Ana White's tutorials now, thanks!
Try the direct link to the pics here:
https://picasaweb.google.com/117243087436465311086/DIYNightstands?authuser=0&authkey=Gv1sRgCLHZr8vGu4X41QE&feat=directlink
I really like this, however the trouble forme is that my bed is higher than average so I need something closer to 30" high...know where I could find some ideas
ReplyDelete