Showing posts with label Ideas. Show all posts

Stacked Baseboards

Pin It
As I try to waste time this morning to avoid going in the garage to build the bookcase for the half bath, I'd thought I'd answer one of the emails I received from a reader.

I've lived in this house for over ten years.  According to my master plan when I moved in, I should have completely been finished with all my remodel projects by now....finished the basement and possibly have an in-ground pool.  However, when I tend to remodel over and over until I think I've got it right things take a bit longer than I plan.  The only thing I have going for me is my overwhelming need to keep the structure as classic as I can.

By classic, I'm referring to the oak wood floors, trims & molding, windows, doors, etc.  The "structure" things you shouldn't really need to change when you remodel a room around a new comforter you purchase.  Classic white trim and oak wood floors (in my eyes and heart) will always be in style.

A reader spotted these baseboards in a photo of an end table I did last year.

Hallway to family room from front door

When I started installing the 2000+/- square feet of wood floors about three or four years into living here, I was sitting on the couch with a Pottery Barn catalog on my lap.  I don't have it anymore or I'd show you the picture of the inspiration.  While flipping through it I saw one of their beautiful pieces of furniture, but that isn't what caught my eye.  It was the stacked baseboard behind it.  I had to have sat there for an hour trying to figure out how to recreate those same baseboards.  But the thing that kept halting me was the fact their baseboards looked like a 1x12 board routed with beautiful grooves to create a piece of art.

Then, I set down the catalog and headed to my hardware store for therapy (Yes, I like to hang out in the lumber section to clear my head.  Some girls shoe shop, I buy lumber.  Don't judge).  I started picking up pieces of trim molding and inspecting them.  I brought home about five different pieces and began to create.


Hallway

But, when the dust settled, this is what I ended up doing.

1 - Top piece 1 1/4" Picture molding
2 - Middle piece 1" framed rope molding
3 - 5" baseboard (which I'm certain you could create with two separate pieces)

Unfortunately, it was BB (before blog) so I don't remember item numbers, prices, etc.  But, if you have read this blog before you know I'm all about creating something special on a very thrifty budget.  I wouldn't have bought the high end $5 a linear foot stuff.  When I win the lottery (because I will someday, I just know it) I will probably still have the same need to recreate things on a budget I will just have way more time to do it.

I measured 11.5" up from the floor (same as a 1x12" piece of lumber) marked around the room with my tape measure and level and installed the picture molding.  Then I marked 8" up and repeated the process with the framed rope pieces.  Then I installed the baseboards.  I don't think it matters if you start at the top or the bottom.

Then, caulk, prime and paint.  I do remember the day I painted mine I had the Cardinal v Brewer game on in the background.  It was hard to pay attention to cutting in with the distraction.

Front Living Room


I still have some requests to see the kitchen (which was also a total gut before the blog).  I haven't forgotten.

Have a great day!!!

Karen

Linked to:

Simple Fix for Furniture Backing

Pin It

These little guys can help your furniture.

Yeah, yeah.  I know they say right there on the box they are for carpet.  But, wait!  Check out how to do a quick fix on your furniture.


Have you ever moved a heavy piece of furniture (especially across a carpeted room) and the backing comes loose?  If you are like me, your first thought is - "Who Cares?", it will just be smushed up against the wall.

As crazy as it sounds, that cheap, thin backing does more than just cover the back.  In most cases, it does help keep your furniture in one piece and square.

While I was moving those tall pantry cabinets to my garage yesterday by myself and I noticed one of the backings was coming off.  Since I used these on several projects to attach thin lauan to furniture, I grabbed the pack and fixed the cabinet in just about thirty seconds.

Next time you are rearranging your furniture, be sure to keep a small packet of these carpet tacks in your junk drawer, right next to the small nails you use to hang pictures.

Go from this....


To this...


How crazy does it sound to feel like you accomplished something just by tapping a few tacks on the back of furniture?

Have a great week!

Karen :)

Laundry Room Design Plan

Pin It

When we built our cookie cutter house, I didn't really put much thought into the laundry room layout and space.  At the time we only had two small children, so the amount of dirty clothes in the laundry room wasn't too bad.

I should probably point out, our laundry room has to serve double duty - laundry room and pantry.  When we remodeled our kitchen a few years ago there was this wasted mini cabinet and counter next to the refrigerator (see floor plan below).  I wanted to rip out the pantry (move it into the laundry room) and make a Baking Center.

Here is an idea of how I want the room to look.  Storage from floor to the top of the 9' ceilings, build a can good caddy, build tons of roll out shelves and most importantly...build three bays at the bottom for the laundry baskets to keep them from the middle of the floor.

See how the laundry room is long and narrow?  Kind of hard to work in that room, especially with front load machines.  It is kind of like a yoga workout when I do laundry.  Oh, and we removed the door to the laundry room from the kitchen.  I really don't know why there was a door there since you have to walk through that room to go to your car many times a day.  It isn't like you can just close that door and ignore the laundry.  Trust me, I tried.

I started a folder on Pinterest for the many ideas I have, but my space is very limited.


Can you think of anything else I should add to the laundry/pantry area?  I still think I'm missing something important.  I can't raise the washer and dryer up off the floor or it will block the window.  I really wanted to do that, but when it was built I added the window to put light in the little room.

I would love to hear your feedback and ideas. 

Thanks Karen :)

Breakfast Room Ideas...

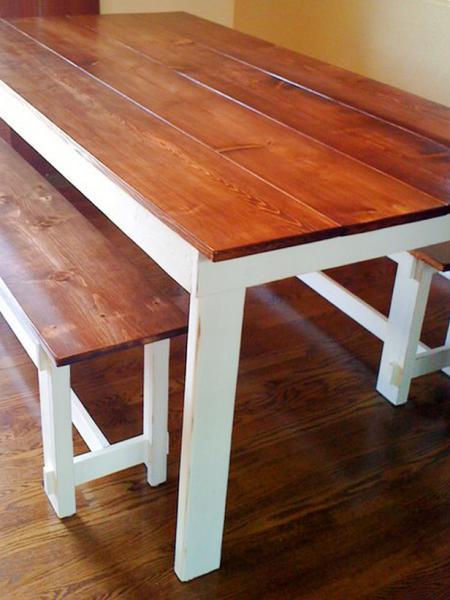
Pin It I am building a new and much smaller table to fit in my tiny breakfast room.  I found a nice farmhouse style table on Ana White's website.  Simple enough to build and easy to adjust to fit my needs.

Then I stumbled upon The Graphics Fairy website and had the idea of incorporating an aged looking stencil to the table top like this.  With the right amount of stain, paint and light sanding, the table top can like like a salvaged piece from long ago.

I hope it turns out as great as I'm picturing it in my head...

Ana White

The Graphics Fairy

I'm also thinking about building a built in bench with open areas underneath to put all the cookbooks.  Like this from Southern Living